#install npm on shared hosting
Explore tagged Tumblr posts
Visit Tumblr Blog
Explore Tumblr blogs with no restrictions, modern design and the best experience.
Last Seen Tumblr Blogs


Fun Fact
130K people were victims of a chain letter scam that affected Tumblr in May 2011.
Text
You can learn NodeJS easily, Here's all you need:
1.Introduction to Node.js
• JavaScript Runtime for Server-Side Development
• Non-Blocking I/0
2.Setting Up Node.js
• Installing Node.js and NPM
• Package.json Configuration
• Node Version Manager (NVM)
3.Node.js Modules
• CommonJS Modules (require, module.exports)
• ES6 Modules (import, export)
• Built-in Modules (e.g., fs, http, events)
4.Core Concepts
• Event Loop
• Callbacks and Asynchronous Programming
• Streams and Buffers
5.Core Modules
• fs (File Svstem)
• http and https (HTTP Modules)
• events (Event Emitter)
• util (Utilities)
• os (Operating System)
• path (Path Module)
6.NPM (Node Package Manager)
• Installing Packages
• Creating and Managing package.json
• Semantic Versioning
• NPM Scripts
7.Asynchronous Programming in Node.js
• Callbacks
• Promises
• Async/Await
• Error-First Callbacks
8.Express.js Framework
• Routing
• Middleware
• Templating Engines (Pug, EJS)
• RESTful APIs
• Error Handling Middleware
9.Working with Databases
• Connecting to Databases (MongoDB, MySQL)
• Mongoose (for MongoDB)
• Sequelize (for MySQL)
• Database Migrations and Seeders
10.Authentication and Authorization
• JSON Web Tokens (JWT)
• Passport.js Middleware
• OAuth and OAuth2
11.Security
• Helmet.js (Security Middleware)
• Input Validation and Sanitization
• Secure Headers
• Cross-Origin Resource Sharing (CORS)
12.Testing and Debugging
• Unit Testing (Mocha, Chai)
• Debugging Tools (Node Inspector)
• Load Testing (Artillery, Apache Bench)
13.API Documentation
• Swagger
• API Blueprint
• Postman Documentation
14.Real-Time Applications
• WebSockets (Socket.io)
• Server-Sent Events (SSE)
• WebRTC for Video Calls
15.Performance Optimization
• Caching Strategies (in-memory, Redis)
• Load Balancing (Nginx, HAProxy)
• Profiling and Optimization Tools (Node Clinic, New Relic)
16.Deployment and Hosting
• Deploying Node.js Apps (PM2, Forever)
• Hosting Platforms (AWS, Heroku, DigitalOcean)
• Continuous Integration and Deployment-(Jenkins, Travis CI)
17.RESTful API Design
• Best Practices
• API Versioning
• HATEOAS (Hypermedia as the Engine-of Application State)
18.Middleware and Custom Modules
• Creating Custom Middleware
• Organizing Code into Modules
• Publish and Use Private NPM Packages
19.Logging
• Winston Logger
• Morgan Middleware
• Log Rotation Strategies
20.Streaming and Buffers
• Readable and Writable Streams
• Buffers
• Transform Streams
21.Error Handling and Monitoring
• Sentry and Error Tracking
• Health Checks and Monitoring Endpoints
22.Microservices Architecture
• Principles of Microservices
• Communication Patterns (REST, gRPC)
• Service Discovery and Load Balancing in Microservices
1 note
·
View note
Text
What is FrontEnd Developer Course ?

Introduction :
Front-end developers focus on the visual and interactive aspects of a website, crafting the user interface and experience using technologies like HTML, CSS, and JavaScript. They design how a website looks and ensure it is responsive and engaging for users. On the other hand, back-end developers work behind the scenes, managing the server, databases, and application logic. They handle data storage, retrieval, and server-side operations, ensuring the functionality and security of the website or application. The collaboration between front-end and back-end developers is crucial for delivering a seamless and fully functional web experience.
Front-End Developer
1.Core Technologies:
HTML (Hypertext Markup Language):
HTML serves as the backbone of web content. It provides a standardized way to structure information on a webpage. Elements like <div>, <p>, and <h1> are essential building blocks, allowing developers to organize and present content logically. HTML5 introduces new semantic elements, such as <nav>, <article>, and <section>, enhancing the structure of web documents.
CSS (Cascading Style Sheets):
CSS is the stylistic language that brings visual appeal to web pages. Selectors target HTML elements, and properties like color, font-size, and margin define their appearance. CSS enables the separation of content and presentation, allowing for consistent styling across an entire website. Advanced CSS features like Flexbox and Grid provide powerful layout options.
JavaScript:
JavaScript is the scripting language that adds interactivity and dynamic behavior to websites. With the advent of ECMAScript 6 (ES6), JavaScript has become more powerful and expressive. Frameworks like React.js, Angular, and Vue.js simplify complex UI development, promoting the creation of interactive and responsive web applications.
2. Responsive Web Design:
Responsive web design ensures a seamless user experience across devices. Media queries in CSS allow developers to apply styles based on the characteristics of the user’s device, adapting the layout and content presentation. Techniques like fluid grids and flexible images enable websites to gracefully scale from desktops to tablets and smartphones.
3. Browser Developer Tools:
Integrated developer tools in browsers offer a robust environment for debugging and optimizing code. Developers can inspect and modify HTML and CSS in real-time, analyze network activity, and diagnose performance issues. Browser developer tools are indispensable for identifying and resolving issues during the development process.
4. Version Control Systems:
Git, a distributed version control system, enables collaborative development by tracking changes in source code. Developers use Git to create branches, merge code changes, and maintain a history of project alterations. Platforms like GitHub, GitLab, and Bitbucket provide centralized repositories for hosting Git projects, fostering collaboration among developers.
5. Build Tools and Package Managers:
npm, as a package manager for Node.js, simplifies the management of project dependencies. It allows developers to install and share packages, enhancing code modularity. Webpack, a module bundler, streamlines the integration of various assets, optimizing the performance of web applications through features like code splitting and hot module replacement.
6. Cross-Browser Compatibility:
Achieving consistent user experiences across different browsers is a common challenge in front-end development. Testing tools like BrowserStack simulate various browser environments, helping developers identify and address compatibility issues. Cross-browser testing ensures that websites function as intended for users, regardless of their chosen browser.
7. Web Performance Optimization:
Optimizing web performance is crucial for delivering a fast and efficient user experience. Techniques include code minification to reduce file sizes, lazy loading of assets to prioritize critical content, and image optimization to balance quality and load times. Google Lighthouse is a tool that assesses web page performance, providing insights and recommendations for improvement.
8. Accessibility (a11y):
Creating accessible websites is an ethical and legal imperative. Web Content Accessibility Guidelines (WCAG) offer a comprehensive set of guidelines to ensure websites are usable by individuals with disabilities. Implementing accessible design practices, such as providing alternative text for images and using semantic HTML, promotes inclusivity and broadens the reach of digital content.
9. Progressive Web Apps (PWAs):
Progressive Web Apps (PWAs) combine the best features of web and mobile applications. They provide offline functionality, push notifications, and fast load times. Service workers, a key component of PWAs, enable background processes, allowing users to access content even in the absence of a network connection.
10. Continuous Learning:
Front-end development is a dynamic field that evolves rapidly. Developers need to stay informed about new tools, frameworks, and best practices. Resources like MDN Web Docs offer comprehensive documentation, while platforms like freeCodeCamp provide hands-on learning experiences. Continuous learning ensures that developers remain at the forefront of industry advancements and deliver cutting-edge solutions.
The following set of Frontend Developer Questions are based on HTML.
1. What Is an Attribute in HTML?
2. What is Marquee in HTML?
3. What is Semantic HTML?
4. How do you Display a Table on an HTML Webpage?
5. What is SVG in HTML?
6. In HTML, how do you separate a section of text?
7. How do you Create Nested Web Pages in HTML?
1. What Is an Attribute in HTML?
In HTML (Hypertext Markup Language), an “attribute” provides additional information about an HTML element and is always included in the opening tag of the element. Attributes are used to modify or customize the behavior of an HTML element.
Attributes consist of a name and a value, separated by an equal sign (=) and enclosed in double or single quotes. The value should be assigned to the attribute to specify its effect on the element.
html
<element attribute=”value”>Content</element>
Let’s break it down:
element: This is the HTML element to which you are applying the attribute.
attribute: The specific characteristic or property you want to assign to the element.
value: The value associated with the attribute. It defines how the attribute affects the element.
For example, the href attribute in an <a> (anchor) element is used to specify the URL that the link points to:
html
<a href=”https://www.example.com">Visit Example.com</a>
In this case, href is the attribute, and “https://www.example.com" is its value.
Attributes can vary depending on the HTML element. Different elements support different attributes. Learning about common attributes associated with specific HTML elements is crucial for creating effective and well-structured web pages.
2. What is Marquee in HTML?
In HTML, the <marquee> element is used to create a scrolling text or image effect on a web page. It was commonly used in the early days of the web to draw attention to certain content, but its usage has become less popular due to concerns about accessibility and modern web design practices.
Here’s a simple explanation:
html
<marquee direction=”left|right|up|down” behavior=”scroll|slide|alternate” scrollamount=”number”>Text or Image</marquee>
direction: Specifies the direction of the scrolling. It can be “left” (default), “right,” “up,” or “down.”
behavior: Defines the scrolling behavior. It can be “scroll” (default), “slide,” or “alternate” (alternating between scrolling and sliding).
scrollamount: Determines the speed of the scrolling. The higher the number, the faster the scrolling.
For example, to create a simple left-scrolling marquee, you would use.
html
<marquee direction=”left”>Scrolling Text</marquee>
Keep in mind that the <marquee> element is considered obsolete in HTML5, and it’s not recommended for use in modern web development. Instead, CSS and JavaScript are preferred for creating dynamic and animated effects, as they offer more control, better performance, and improved accessibility.
3. What is Semantic HTML?
Semantic HTML (HyperText Markup Language) refers to using HTML markup in a way that accurately represents the structure and meaning of the content on a webpage. In simpler terms, it involves choosing HTML elements that best describe the type of content they enclose.
Semantic Elements:
HTML has a set of elements that carry meaning about the structure of your document. For example, , , , , , etc. These elements provide information about the role of the enclosed content.
Meaningful Tags:
Instead of using generic tags like or for everything, semantic HTML encourages the use of specific tags that convey the purpose of the content they wrap. For instance, use for navigation links, for paragraphs, to for headings, etc.
Accessibility:
Semantic HTML improves accessibility by providing a clear document structure. This benefits users who rely on screen readers or other assistive technologies to navigate and understand the content.
Search Engine Optimization (SEO):
Search engines use the structure of your HTML to understand the content of your webpage. Semantic HTML can contribute to better SEO because search engines can more accurately interpret the meaning and importance of different parts of your content.
Readability and Maintenance:
Using semantic HTML makes your code more readable and understandable for other developers (including your future self). It also facilitates easier maintenance and updates because the code reflects the logical structure of the content.
Example of non-semantic HTML:
html
<div id=”header”>
<div id=”logo”>Logo</div>
<div id=”nav”>Navigation</div>
</div>
<div id=”main”>
<div id=”content”>Content</div>
<div id=”sidebar”>Sidebar</div>
</div>
<div id=”footer”>Footer</div>
Example of semantic HTML:
html
<header>
<div id=”logo”>Logo</div>
<nav>Navigation</nav>
</header>
<main>
<article>
<div id=”content”>Content</div>
</article>
<aside id=”sidebar”>Sidebar</aside>
</main>
<footer>Footer</footer>
In the semantic example, the structure and purpose of each section are clearly defined using semantic HTML elements, making it more meaningful and understandable.
4. How do you Display a Table on an HTML Webpage?
The displaying a table on an HTML webpage is a common task and can be done using the <table>, <tr>, <th>, and <td> elements.
Create a Table:
Use the element to define a table on your webpage.
html
<table>
<! — table rows and cells will go here →
</table>
Add Table Rows:
Use the element to define a table row. Each row will contain cells for your data.
html
<table>
<tr>
<! — table cells will go here →
</tr>
</table>
Add Table Header Cells (Optional):
Use the element to define header cells. These cells are typically used for column or row headers.
html
<table>
<tr>
<th>Header 1</th>
<th>Header 2</th>
<! — add more header cells if needed →
</tr>
<tr>
<! — data cells will go here →
</tr>
</table>
Add Table Data Cells:
Use the element to define data cells within your rows.
html
<table>
<tr>
<th>Header 1</th>
<th>Header 2</th>
</tr>
<tr>
<td>Data 1</td>
<td>Data 2</td>
<! — add more data cells if needed →
</tr>
</table>
Putting it all together, here’s a simple example:
html
<!DOCTYPE html>
<html>
<head>
<title>Simple Table Example</title>
</head>
<body>
<h2>Sample Table</h2>
<table border=”1">
<tr>
<th>Header 1</th>
<th>Header 2</th>
</tr>
<tr>
<td>Data 1</td>
<td>Data 2</td>
</tr>
<tr>
<td>Data 3</td>
<td>Data 4</td>
</tr>
</table>
</body>
</html>
In this example, a table with two columns and three rows is created. The first row contains header cells (<th>), and the subsequent rows contain data cells (<td>). The border=”1" attribute is used to add a border to the table for better visibility, but it’s not required. You can customize the structure and appearance of the table according to your needs.
5. What is SVG in HTML?
SVG stands for Scalable Vector Graphics. It is an XML-based vector image format that is used to define two-dimensional vector graphics for the web. SVG images can be created and edited with any text editor, and they can be scaled to different sizes without losing quality. In HTML, SVG is often used to embed vector graphics directly into a web page.
Here are some key points about SVG in HTML:
XML-Based Format: SVG is based on XML (eXtensible Markup Language), which means that SVG files are essentially text files that can be created and edited with a text editor.
Vector Graphics: SVG is well-suited for describing vector graphics, which are graphics that are defined by mathematical equations. This makes SVG images scalable without loss of quality, as they can be resized to any size.
Embedding in HTML: SVG images can be embedded directly into HTML documents using the <svg> element. This allows you to include graphics within your HTML code, and they can be manipulated using CSS and JavaScript.
html
<svg width=”100" height=”100">
<circle cx=”50" cy=”50" r=”40" stroke=”black” stroke-width=”3" fill=”red” />
</svg>
Interactive Elements: SVG supports interactive elements and can be scripted using JavaScript. This allows for dynamic and interactive graphics on web pages.
Graphics Editing Software: SVG files can be created using graphics editing software like Adobe Illustrator or Inkscape, and then the generated SVG code can be directly embedded into HTML.
Using SVG in HTML is beneficial for creating graphics that need to scale well across different screen sizes and resolutions. It is widely supported by modern web browsers.
6. In HTML, how do you separate a section of text?
In HTML, you can use various elements to separate and structure different sections of text. Here are a few commonly used elements for this purpose.
Paragraphs (<p>):
Use the <p> element to define paragraphs of text. Each <p> tag creates a new paragraph, and the content inside the tag is treated as a separate block.
html
<p>This is the first paragraph.</p>
<p>This is the second paragraph.</p>
Headings (<h1>, <h2>, <h3>, <h4>, <h5>, <h6>):
Headings are used to define headings for sections of content. They create a hierarchical structure with <h1> being the highest level and <h6> being the lowest.
html
<h1>Main Heading</h1>
<h2>Subheading 1</h2>
<h3>Sub-subheading 1.1</h3>
Divisions (<div>):
The <div> element is a generic container that can be used to group and separate content. It doesn’t add any specific styling or formatting by default, but it can be styled with CSS.
html
<div>
<p>This is a paragraph inside a div.</p>
</div>
Line Breaks (<br>):
The <br> element is used to insert a line break within text, effectively creating a new line without starting a new paragraph.
html
This is some text.<br>
This is on a new line.
Choose the element that best fits your content structure. Combining these elements allows you to create well-organized and semantically meaningful HTML documents.
7. How do you Create Nested Web Pages in HTML?
Creating nested web pages in HTML involves structuring your HTML documents in a hierarchical manner. This is typically done using HTML tags to represent different levels of content. Here’s a simple example of how you can create nested web pages.
html
<!DOCTYPE html>
<html lang=”en”>
<head>
<meta charset=”UTF-8">
<meta name=”viewport” content=”width=device-width, initial-scale=1.0">
<title>Nested Pages Example</title>
</head>
<body>
<! — Main Page Content →
<header>
<h1>Main Page</h1>
</header>
<nav>
<ul>
<li><a href=”#”>Home</a></li>
<li><a href=”#”>About</a></li>
<li><a href=”#”>Contact</a></li>
</ul>
</nav>
<main>
<section>
<h2>Introduction</h2>
<p>This is the main content of the page.</p>
</section>
<! — Nested Page →
<section>
<h2>Subpage</h2>
<p>This is a nested page within the main page.</p>
</section>
<! — Another Nested Page →
<section>
<h2>Another Subpage</h2>
<p>This is another nested page within the main page.</p>
</section>
</main>
<! — Footer →
<footer>
<p>© 2023 Your Website</p>
</footer>
</body>
</html>
In this example:
The main page contains a header, navigation bar, main content, and a footer.
The main content includes sections representing different parts of the page.
Two sections () within the main content are considered as nested pages. These sections can be thought of as subpages within the main page.
You can extend this structure further based on your needs. You might also use other tags like <article>, <aside>, <div>, etc., depending on the semantic meaning of the content. The key is to maintain a logical structure that reflects the hierarchy of your content.

Thanks for reading ,hopefully you like the article if you want to take Full stack Masters course from our Institute please attend our live demo sessions or contact us: +918464844555 providing you with the best Online Full Stack Developer Course in Hyderabad with an affordable course fee structure.
0 notes
Text
Simplifying Database management in NodeJS using ORM
What is ORM in Node.js?
ORM (Object Relational Models) is a way of mapping of relational database systems to objects. Various database systems access data in various ways, and ORM makes it simpler for us to maintain objects even when the sources and apps they access change over time.

By using ORM, data migration between databases can be streamlined and seamless. ORM maintains objects despite changes in the apps and sources of database access, since different database systems access data in different ways.
What are the benefits of using an ORM?
Simplified Database Interaction: One of the primary advantages of Node.js ORM is the abstraction it provides over raw SQL queries. Developers can work with a higher-level, object-oriented syntax that closely resembles the application’s programming language, making it easier to read, write, and maintain database-related code.
Cross-Database Compatibility: Node.js ORM frameworks often support multiple database systems, such as MySQL, PostgreSQL, SQLite, and more. This cross-database compatibility allows developers to switch between databases or even migrate their applications to a different database system without significant changes to the codebase.
Model-Driven Development: ORM frameworks promote the use of data models to represent database tables and their relationships. By defining these models, developers can work with entities in the application code that closely mirror the database structure.
Data Validation and Transformation: ORM frameworks often include built-in validation and transformation mechanisms. Developers can define rules and constraints on data fields, ensuring that only valid and consistent data is stored in the database.
Database Migration Management: ORM frameworks usually provide tools for managing database schema changes and migrations. This is especially beneficial when the application evolves and requires modifications to the database structure.
Optimized Query Generation: ORM generate efficient SQL queries tailored to the specific database system, optimizing performance and minimizing the risk of common performance pitfalls.
Code Reusability: With ORM frameworks, developers can encapsulate database-related logic within reusable functions or methods. This leads to cleaner and more modular code, allowing developers to easily share and reuse database interaction components across different parts of the application.
Testing and Mocking: ORM frameworks facilitate unit testing by providing mockable interfaces for database interactions. Developers can write tests without needing to connect to a live database, making the testing process faster, more predictable, and less dependent on external resources.
What are the steps to integrate an ORM in NodeJS?
Initialize Your Node.js Project (if not done already):
If you haven’t already set up a Node.js project, navigate to your project’s root directory using your terminal and run the following command to initialize a new Node.js project:
npm init
Follow the prompts to configure your project settings and create a package.json file.
Choose an ORM:
Decide which ORM you want to use for your project. Some popular ORM frameworks for Node.js include Sequelize, Mongoose, TypeORM, and Bookshelf. Research each ORM to determine which one best fits your project’s requirements.
Install the Chosen ORM Package:
Once you’ve selected an ORM, you can install the corresponding npm package. Use the following command to install the package globally (recommended for global CLI tools) or locally (recommended for most projects):
# To install globally
npm I -g orm-package-name
# To install locally
npm i orm-package-name
Configure the ORM:
ORM frameworks usually require some configuration to connect to your database. Create a configuration file (e.g., config.js or database.js) in your project and specify the database connection details such as host, port, username, password, and database name. In Sequelize it is done like this-
const Sequelize = require(“sequelize”);
const sequelize = new Sequelize(
‘hello_world_db’,
‘DATABASE_USERNAME’,
‘DATABASE_PASSWORD’,
{
host: ‘DATABASE_HOST’,
dialect: ‘mysql’
}
);
Import and Initialize the ORM:
In your Node.js application code, import the installed ORM package and initialize it using the configuration you’ve set up. This step may involve creating an instance of the ORM’s main class and passing the configuration as parameters. For example to import Sequelize ORM we use the following command :-
sequelize.authenticate().then(() => {
console.log(‘Connection has been established successfully.’);
}).catch((error) => {
console.error(‘Unable to connect to the database: ‘, error);
});
Define Models:
Define your data models using the ORM’s syntax. Models represent database tables and their relationships. This step involves creating classes or objects that map to database tables, specifying fields, data types, and relationships between tables. In Sequelize we define models as given in code below:-
const Book = sequelize.define(“books”, {
title: {
type: DataTypes.STRING,
allowNull: false
},
author: {
type: DataTypes.STRING,
allowNull: false
},
release_date: {
type: DataTypes.DATEONLY,
},
subject: {
type: DataTypes.INTEGER,
}
});
Interact with the Database:
With your models and database connection set up, you can now start interacting with the database using the ORM’s methods. This might include querying, inserting, updating, and deleting records using the model objects you’ve defined.
sequelize.sync().then(() => {
console.log(‘Book table created successfully!’);
Book.create({
title: “Clean Code”,
author: “Robert Cecil Martin”,
release_date: “2021-12-14”,
subject: 3
}).then(res => {
console.log(res)
}).catch((error) => {
console.error(‘Failed to create a new record : ‘, error);
});
}).catch((error) => {
console.error(‘Unable to create table : ‘, error);
});
Handle Errors and Monitor Performance:
As you work with the ORM, make sure to handle errors gracefully and optimize your queries for performance. The ORM’s documentation should provide guidance on error handling and query optimization.
Test and Refine:
Test your application thoroughly to ensure that the ORM integration is working as expected. Use testing frameworks and tools to write unit and integration tests for your database interactions. Refine your code based on testing results and feedback.
Conclusion
An ORM is ideal and suitable for beginner web developers or small-scale projects. Since there is no ORM that solves all your problems, the best ORM is the ORM that is most suitable for your application need.
In summary, use ORM to achieve code standardization, security, maintainability, language abstraction, DRY, etc.
#Offshore Outsourced Software Product Development#digital engineering services#services data engineering#services digital engineering#services digital operations in California#New York#Detroit in US#North Rhine-Westphalia#Germany
0 notes
Photo

hydralisk98′s web projects tracker:
Core principles=
Fail faster
‘Learn, Tweak, Make’ loop
This is meant to be a quick reference for tracking progress made over my various projects, organized by their “ultimate target” goal:
(START)
(Website)=
Install Firefox
Install Chrome
Install Microsoft newest browser
Install Lynx
Learn about contemporary web browsers
Install a very basic text editor
Install Notepad++
Install Nano
Install Powershell
Install Bash
Install Git
Learn HTML
Elements and attributes
Commenting (single line comment, multi-line comment)
Head (title, meta, charset, language, link, style, description, keywords, author, viewport, script, base, url-encode, )
Hyperlinks (local, external, link titles, relative filepaths, absolute filepaths)
Headings (h1-h6, horizontal rules)
Paragraphs (pre, line breaks)
Text formatting (bold, italic, deleted, inserted, subscript, superscript, marked)
Quotations (quote, blockquote, abbreviations, address, cite, bidirectional override)
Entities & symbols (&entity_name, &entity_number,  , useful HTML character entities, diacritical marks, mathematical symbols, greek letters, currency symbols, )
Id (bookmarks)
Classes (select elements, multiple classes, different tags can share same class, )
Blocks & Inlines (div, span)
Computercode (kbd, samp, code, var)
Lists (ordered, unordered, description lists, control list counting, nesting)
Tables (colspan, rowspan, caption, colgroup, thead, tbody, tfoot, th)
Images (src, alt, width, height, animated, link, map, area, usenmap, , picture, picture for format support)
old fashioned audio
old fashioned video
Iframes (URL src, name, target)
Forms (input types, action, method, GET, POST, name, fieldset, accept-charset, autocomplete, enctype, novalidate, target, form elements, input attributes)
URL encode (scheme, prefix, domain, port, path, filename, ascii-encodings)
Learn about oldest web browsers onwards
Learn early HTML versions (doctypes & permitted elements for each version)
Make a 90s-like web page compatible with as much early web formats as possible, earliest web browsers’ compatibility is best here
Learn how to teach HTML5 features to most if not all older browsers
Install Adobe XD
Register a account at Figma
Learn Adobe XD basics
Learn Figma basics
Install Microsoft’s VS Code
Install my Microsoft’s VS Code favorite extensions
Learn HTML5
Semantic elements
Layouts
Graphics (SVG, canvas)
Track
Audio
Video
Embed
APIs (geolocation, drag and drop, local storage, application cache, web workers, server-sent events, )
HTMLShiv for teaching older browsers HTML5
HTML5 style guide and coding conventions (doctype, clean tidy well-formed code, lower case element names, close all html elements, close empty html elements, quote attribute values, image attributes, space and equal signs, avoid long code lines, blank lines, indentation, keep html, keep head, keep body, meta data, viewport, comments, stylesheets, loading JS into html, accessing HTML elements with JS, use lowercase file names, file extensions, index/default)
Learn CSS
Selections
Colors
Fonts
Positioning
Box model
Grid
Flexbox
Custom properties
Transitions
Animate
Make a simple modern static site
Learn responsive design
Viewport
Media queries
Fluid widths
rem units over px
Mobile first
Learn SASS
Variables
Nesting
Conditionals
Functions
Learn about CSS frameworks
Learn Bootstrap
Learn Tailwind CSS
Learn JS
Fundamentals
Document Object Model / DOM
JavaScript Object Notation / JSON
Fetch API
Modern JS (ES6+)
Learn Git
Learn Browser Dev Tools
Learn your VS Code extensions
Learn Emmet
Learn NPM
Learn Yarn
Learn Axios
Learn Webpack
Learn Parcel
Learn basic deployment
Domain registration (Namecheap)
Managed hosting (InMotion, Hostgator, Bluehost)
Static hosting (Nertlify, Github Pages)
SSL certificate
FTP
SFTP
SSH
CLI
Make a fancy front end website about
Make a few Tumblr themes
===You are now a basic front end developer!
Learn about XML dialects
Learn XML
Learn about JS frameworks
Learn jQuery
Learn React
Contex API with Hooks
NEXT
Learn Vue.js
Vuex
NUXT
Learn Svelte
NUXT (Vue)
Learn Gatsby
Learn Gridsome
Learn Typescript
Make a epic front end website about
===You are now a front-end wizard!
Learn Node.js
Express
Nest.js
Koa
Learn Python
Django
Flask
Learn GoLang
Revel
Learn PHP
Laravel
Slim
Symfony
Learn Ruby
Ruby on Rails
Sinatra
Learn SQL
PostgreSQL
MySQL
Learn ORM
Learn ODM
Learn NoSQL
MongoDB
RethinkDB
CouchDB
Learn a cloud database
Firebase, Azure Cloud DB, AWS
Learn a lightweight & cache variant
Redis
SQLlite
NeDB
Learn GraphQL
Learn about CMSes
Learn Wordpress
Learn Drupal
Learn Keystone
Learn Enduro
Learn Contentful
Learn Sanity
Learn Jekyll
Learn about DevOps
Learn NGINX
Learn Apache
Learn Linode
Learn Heroku
Learn Azure
Learn Docker
Learn testing
Learn load balancing
===You are now a good full stack developer
Learn about mobile development
Learn Dart
Learn Flutter
Learn React Native
Learn Nativescript
Learn Ionic
Learn progressive web apps
Learn Electron
Learn JAMstack
Learn serverless architecture
Learn API-first design
Learn data science
Learn machine learning
Learn deep learning
Learn speech recognition
Learn web assembly
===You are now a epic full stack developer
Make a web browser
Make a web server
===You are now a legendary full stack developer
[...]
(Computer system)=
Learn to execute and test your code in a command line interface
Learn to use breakpoints and debuggers
Learn Bash
Learn fish
Learn Zsh
Learn Vim
Learn nano
Learn Notepad++
Learn VS Code
Learn Brackets
Learn Atom
Learn Geany
Learn Neovim
Learn Python
Learn Java?
Learn R
Learn Swift?
Learn Go-lang?
Learn Common Lisp
Learn Clojure (& ClojureScript)
Learn Scheme
Learn C++
Learn C
Learn B
Learn Mesa
Learn Brainfuck
Learn Assembly
Learn Machine Code
Learn how to manage I/O
Make a keypad
Make a keyboard
Make a mouse
Make a light pen
Make a small LCD display
Make a small LED display
Make a teleprinter terminal
Make a medium raster CRT display
Make a small vector CRT display
Make larger LED displays
Make a few CRT displays
Learn how to manage computer memory
Make datasettes
Make a datasette deck
Make floppy disks
Make a floppy drive
Learn how to control data
Learn binary base
Learn hexadecimal base
Learn octal base
Learn registers
Learn timing information
Learn assembly common mnemonics
Learn arithmetic operations
Learn logic operations (AND, OR, XOR, NOT, NAND, NOR, NXOR, IMPLY)
Learn masking
Learn assembly language basics
Learn stack construct’s operations
Learn calling conventions
Learn to use Application Binary Interface or ABI
Learn to make your own ABIs
Learn to use memory maps
Learn to make memory maps
Make a clock
Make a front panel
Make a calculator
Learn about existing instruction sets (Intel, ARM, RISC-V, PIC, AVR, SPARC, MIPS, Intersil 6120, Z80...)
Design a instruction set
Compose a assembler
Compose a disassembler
Compose a emulator
Write a B-derivative programming language (somewhat similar to C)
Write a IPL-derivative programming language (somewhat similar to Lisp and Scheme)
Write a general markup language (like GML, SGML, HTML, XML...)
Write a Turing tarpit (like Brainfuck)
Write a scripting language (like Bash)
Write a database system (like VisiCalc or SQL)
Write a CLI shell (basic operating system like Unix or CP/M)
Write a single-user GUI operating system (like Xerox Star’s Pilot)
Write a multi-user GUI operating system (like Linux)
Write various software utilities for my various OSes
Write various games for my various OSes
Write various niche applications for my various OSes
Implement a awesome model in very large scale integration, like the Commodore CBM-II
Implement a epic model in integrated circuits, like the DEC PDP-15
Implement a modest model in transistor-transistor logic, similar to the DEC PDP-12
Implement a simple model in diode-transistor logic, like the original DEC PDP-8
Implement a simpler model in later vacuum tubes, like the IBM 700 series
Implement simplest model in early vacuum tubes, like the EDSAC
[...]
(Conlang)=
Choose sounds
Choose phonotactics
[...]
(Animation ‘movie’)=
[...]
(Exploration top-down ’racing game’)=
[...]
(Video dictionary)=
[...]
(Grand strategy game)=
[...]
(Telex system)=
[...]
(Pen&paper tabletop game)=
[...]
(Search engine)=
[...]
(Microlearning system)=
[...]
(Alternate planet)=
[...]
(END)
4 notes
·
View notes
Text
npm Security Insights API Preview Part 3: Behavioral Analysis
This is the third in a series of blog posts we’re running to preview and gather input on the new security insights API we’re developing.
Previous posts
Part 1: Package publication Insights
Part 2: Malware
Today’s topic: Behavioral Analysis
A lot of stuff happens when you install an npm package. npm downloads and extracts dependencies, but it also runs install hooks. These install hooks can have all kinds of side effects from compiling binaries, downloading other dependencies or maybe something a bit more malicious in nature. Post-install scripts are the most popular malware infection method right now.
In an effort to understand this further and to make side effects (malicious or not) transparent, the npm security team has been hard at work building infrastructure to do behavioral analysis of npm packages at scale.
What is behavioral analysis?
For every package published to the registry, we run the package installation process inside a controlled and instrumented environment. Anything that goes in or out, gets added or deleted is captured and stored. This type of analysis is especially useful in situations with obfuscated source code or binary artifacts where reverse engineering or static analysis is particularly difficult. It does however product a mountain of data--data that you'll be able to sift through effectively with the security insights API
What will the security insights API have available?
We’re going to initially launch with three pieces of behavioral metadata exposed. Through this analysis, we will have a lot more data than you are ever going to want to sift through. To make it useful, we’re going to pare back what we’re going to make initially available and, as our capabilities grow, we’ll continue to expose more data.
The initial release of the API will likely contain the following info from our behavioral analysis on a package:
DNS requests (hosts contacted / looked up)
processes executed (including command lines and arguments)
network traffic summary
Real world example: cryptocurrency malware
Let's take a look at a simple cryptocurrency malware sample. This sample runs coin mining software on install similar to what we have seen in the past.

Figure 1: Request

Figure 2: Response
In this example, we’re going to query for the answers returned by the dns requests made. It very obviously shows a site that is out of place for a typical npm install.

Figure 3: Request
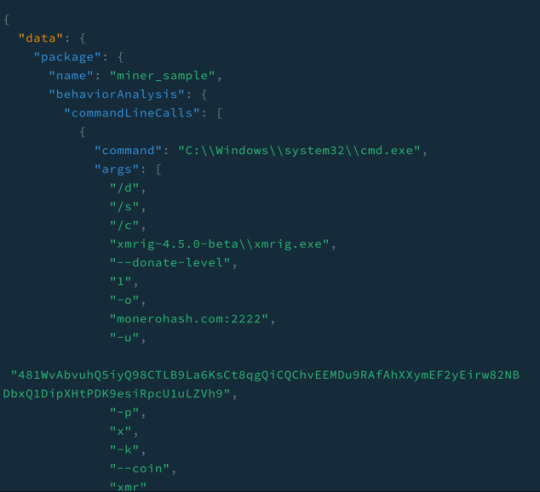
Figure 4: Response
Investigating further by requesting the command line and its arguments for this package shows a suspicious binary being executed, extremely useful information when trying to understand what might be going on with a package without installing or running it yourself.
How would you use it?
How cool would it be to know if a package is making insecure network requests before you install it or be able to diff two versions to see what might have changed? We’ve seen a lot of interesting ideas from the previous insights we’ve shared.
Update: Signups for the private beta are now closed.
1 note
·
View note
Text
Building a Twitter Clone in React.js and deploy Firebase: A Step-by-Step Guide
Introduction: Twitter has revolutionized the way we communicate and share information. If you're looking to enhance your React.js skills by building a real-world application, a Twitter clone is a great project to undertake. In this tutorial, we will guide you through the process of building a Twitter clone using React.js. We will utilize the codebase available at https://github.com/KevinRoozrokh/twitter-react-js as a starting point. Let's dive in and create our own Twitter-like application!
Prerequisites: To follow along with this tutorial, make sure you have the following: 1. Basic knowledge of React.js and JavaScript. 2. Node.js and npm (Node Package Manager) installed on your machine. 3. A code editor of your choice (e.g., Visual Studio Code).
Step 1: Setting Up the Project 1. Clone the starter code from the GitHub repository: https://github.com/KevinRoozrokh/twitter-react-js. 2. Open the project in your code editor. 3. Open a terminal or command prompt and navigate to the project's root directory. 4. Run `npm install` to install the project dependencies.
Step 2: Configuring Firebase 1. Go to the Firebase website (https://firebase.google.com/) and sign in with your Google account. 2. Create a new Firebase project by following the provided instructions. 3. In your project dashboard, click on "Add Firebase to your web app." 4. Copy the Firebase configuration object. 5. In the project's codebase, locate the `src/firebase.js` file and replace the existing configuration with the copied Firebase configuration.
Step 3: Understanding the Code Structure 1. Familiarize yourself with the project's code structure. 2. Open the project's files in your code editor and explore the different components and folders. 3. Take note of the key components, such as `App.js`, `components/`, and `pages/`.
Step 4: Building the User Interface 1. Begin by working on the layout components, such as the header, sidebar, and tweet input. 2. Refactor and modify the existing components as per your design preferences. 3. Use the Material-UI library (https://mui.com/) or any other UI framework of your choice to enhance the user interface. 4. Create new components as needed, such as tweet cards, user profiles, or trending topics.
Step 5: Implementing Firebase Authentication 1. Add user authentication functionality using Firebase Authentication. 2. Modify the login and signup components to integrate with Firebase's authentication services. 3. Implement login and signup methods, error handling, and user session management.
Step 6: Working with Firestore 1. Utilize Firebase Firestore to store and retrieve tweets and user data. 2. Create Firestore collections and documents for tweets, users, and other necessary data. 3. Implement methods to fetch, create, and update tweets in the application. 4. Integrate real-time updates using Firestore's real-time listeners.
Step 7: Enhancing Functionality 1. Implement features like liking, retweeting, and replying to tweets. 2. Add user profile functionality, including updating profile information, uploading avatars, and following other users. 3. Incorporate search functionality to search for users or tweets. 4. Implement pagination or infinite scrolling to handle large tweet lists.
Step 8: Deployment 1. Once you are satisfied with your Twitter clone, deploy it to a hosting platform like Firebase Hosting, Netlify, or Vercel. 2. Follow the hosting platform's documentation to deploy your React.js application.
Conclusion: Congratulations on building your own Twitter clone using React.js! Throughout this tutorial, we
walked through setting up the project, configuring Firebase, understanding the code structure, implementing user interface components, integrating Firebase Authentication and Firestore, and enhancing the application's functionality. Remember, this clone is just a starting point, and you can continue to expand and improve upon it as you gain more React.js expertise. Happy coding and exploring the limitless possibilities of React.js!
Written by Kevin K. Roozrokh Follow me on the socials: https://linktr.ee/kevin_roozrokh Portfolio: https://KevinRoozrokh.github.io Hire me on Upwork: https://upwork.com/freelancers/~01cb1ed2c221f3efd6?viewMode=1
#twitter#coding#programming#reactjs#react#github#software#information technology#open source#software testing#computing
0 notes
Text
What is FrontEnd Developer ?

Introduction :
Front-end developers focus on the visual and interactive aspects of a website, crafting the user interface and experience using technologies like HTML, CSS, and JavaScript. They design how a website looks and ensure it is responsive and engaging for users. On the other hand, back-end developers work behind the scenes, managing the server, databases, and application logic. They handle data storage, retrieval, and server-side operations, ensuring the functionality and security of the website or application. The collaboration between front-end and back-end developers is crucial for delivering a seamless and fully functional web experience.
Front-End Developer
1.Core Technologies:
HTML (Hypertext Markup Language):
HTML serves as the backbone of web content. It provides a standardized way to structure information on a webpage. Elements like <div>, <p>, and <h1> are essential building blocks, allowing developers to organize and present content logically. HTML5 introduces new semantic elements, such as <nav>, <article>, and <section>, enhancing the structure of web documents.
CSS (Cascading Style Sheets):
CSS is the stylistic language that brings visual appeal to web pages. Selectors target HTML elements, and properties like color, font-size, and margin define their appearance. CSS enables the separation of content and presentation, allowing for consistent styling across an entire website. Advanced CSS features like Flexbox and Grid provide powerful layout options.
JavaScript:
JavaScript is the scripting language that adds interactivity and dynamic behavior to websites. With the advent of ECMAScript 6 (ES6), JavaScript has become more powerful and expressive. Frameworks like React.js, Angular, and Vue.js simplify complex UI development, promoting the creation of interactive and responsive web applications.
2. Responsive Web Design:
Responsive web design ensures a seamless user experience across devices. Media queries in CSS allow developers to apply styles based on the characteristics of the user’s device, adapting the layout and content presentation. Techniques like fluid grids and flexible images enable websites to gracefully scale from desktops to tablets and smartphones.
3. Browser Developer Tools:
Integrated developer tools in browsers offer a robust environment for debugging and optimizing code. Developers can inspect and modify HTML and CSS in real-time, analyze network activity, and diagnose performance issues. Browser developer tools are indispensable for identifying and resolving issues during the development process.
4. Version Control Systems:
Git, a distributed version control system, enables collaborative development by tracking changes in source code. Developers use Git to create branches, merge code changes, and maintain a history of project alterations. Platforms like GitHub, GitLab, and Bitbucket provide centralized repositories for hosting Git projects, fostering collaboration among developers.
5. Build Tools and Package Managers:
npm, as a package manager for Node.js, simplifies the management of project dependencies. It allows developers to install and share packages, enhancing code modularity. Webpack, a module bundler, streamlines the integration of various assets, optimizing the performance of web applications through features like code splitting and hot module replacement.
6. Cross-Browser Compatibility:
Achieving consistent user experiences across different browsers is a common challenge in front-end development. Testing tools like BrowserStack simulate various browser environments, helping developers identify and address compatibility issues. Cross-browser testing ensures that websites function as intended for users, regardless of their chosen browser.
7. Web Performance Optimization:
Optimizing web performance is crucial for delivering a fast and efficient user experience. Techniques include code minification to reduce file sizes, lazy loading of assets to prioritize critical content, and image optimization to balance quality and load times. Google Lighthouse is a tool that assesses web page performance, providing insights and recommendations for improvement.
8. Accessibility (a11y):
Creating accessible websites is an ethical and legal imperative. Web Content Accessibility Guidelines (WCAG) offer a comprehensive set of guidelines to ensure websites are usable by individuals with disabilities. Implementing accessible design practices, such as providing alternative text for images and using semantic HTML, promotes inclusivity and broadens the reach of digital content.
9. Progressive Web Apps (PWAs):
Progressive Web Apps (PWAs) combine the best features of web and mobile applications. They provide offline functionality, push notifications, and fast load times. Service workers, a key component of PWAs, enable background processes, allowing users to access content even in the absence of a network connection.
10. Continuous Learning:
Front-end development is a dynamic field that evolves rapidly. Developers need to stay informed about new tools, frameworks, and best practices. Resources like MDN Web Docs offer comprehensive documentation, while platforms like freeCodeCamp provide hands-on learning experiences. Continuous learning ensures that developers remain at the forefront of industry advancements and deliver cutting-edge solutions.
The following set of Frontend Developer Questions are based on HTML.
1. What Is an Attribute in HTML?
2. What is Marquee in HTML?
3. What is Semantic HTML?
4. How do you Display a Table on an HTML Webpage?
5. What is SVG in HTML?
6. In HTML, how do you separate a section of text?
7. How do you Create Nested Web Pages in HTML?
1. What Is an Attribute in HTML?
In HTML (Hypertext Markup Language), an “attribute” provides additional information about an HTML element and is always included in the opening tag of the element. Attributes are used to modify or customize the behavior of an HTML element.
Attributes consist of a name and a value, separated by an equal sign (=) and enclosed in double or single quotes. The value should be assigned to the attribute to specify its effect on the element.
html
<element attribute=”value”>Content</element>
Let’s break it down:
element: This is the HTML element to which you are applying the attribute.
attribute: The specific characteristic or property you want to assign to the element.
value: The value associated with the attribute. It defines how the attribute affects the element.
For example, the href attribute in an <a> (anchor) element is used to specify the URL that the link points to:
html
<a href=”https://www.example.com">Visit Example.com</a>
In this case, href is the attribute, and “https://www.example.com" is its value.
Attributes can vary depending on the HTML element. Different elements support different attributes. Learning about common attributes associated with specific HTML elements is crucial for creating effective and well-structured web pages.
2. What is Marquee in HTML?
In HTML, the <marquee> element is used to create a scrolling text or image effect on a web page. It was commonly used in the early days of the web to draw attention to certain content, but its usage has become less popular due to concerns about accessibility and modern web design practices.
Here’s a simple explanation:
html
<marquee direction=”left|right|up|down” behavior=”scroll|slide|alternate” scrollamount=”number”>Text or Image</marquee>
direction: Specifies the direction of the scrolling. It can be “left” (default), “right,” “up,” or “down.”
behavior: Defines the scrolling behavior. It can be “scroll” (default), “slide,” or “alternate” (alternating between scrolling and sliding).
scrollamount: Determines the speed of the scrolling. The higher the number, the faster the scrolling.
For example, to create a simple left-scrolling marquee, you would use.
html
<marquee direction=”left”>Scrolling Text</marquee>
Keep in mind that the <marquee> element is considered obsolete in HTML5, and it’s not recommended for use in modern web development. Instead, CSS and JavaScript are preferred for creating dynamic and animated effects, as they offer more control, better performance, and improved accessibility.
3. What is Semantic HTML?
Semantic HTML (HyperText Markup Language) refers to using HTML markup in a way that accurately represents the structure and meaning of the content on a webpage. In simpler terms, it involves choosing HTML elements that best describe the type of content they enclose.
Semantic Elements:
HTML has a set of elements that carry meaning about the structure of your document. For example, , , , , , etc. These elements provide information about the role of the enclosed content.
Meaningful Tags:
Instead of using generic tags like or for everything, semantic HTML encourages the use of specific tags that convey the purpose of the content they wrap. For instance, use for navigation links, for paragraphs, to for headings, etc.
Accessibility:
Semantic HTML improves accessibility by providing a clear document structure. This benefits users who rely on screen readers or other assistive technologies to navigate and understand the content.
Search Engine Optimization (SEO):
Search engines use the structure of your HTML to understand the content of your webpage. Semantic HTML can contribute to better SEO because search engines can more accurately interpret the meaning and importance of different parts of your content.
Readability and Maintenance:
Using semantic HTML makes your code more readable and understandable for other developers (including your future self). It also facilitates easier maintenance and updates because the code reflects the logical structure of the content.
Example of non-semantic HTML:
html
<div id=”header”>
<div id=”logo”>Logo</div>
<div id=”nav”>Navigation</div>
</div>
<div id=”main”>
<div id=”content”>Content</div>
<div id=”sidebar”>Sidebar</div>
</div>
<div id=”footer”>Footer</div>
Example of semantic HTML:
html
<header>
<div id=”logo”>Logo</div>
<nav>Navigation</nav>
</header>
<main>
<article>
<div id=”content”>Content</div>
</article>
<aside id=”sidebar”>Sidebar</aside>
</main>
<footer>Footer</footer>
In the semantic example, the structure and purpose of each section are clearly defined using semantic HTML elements, making it more meaningful and understandable.
4. How do you Display a Table on an HTML Webpage?
The displaying a table on an HTML webpage is a common task and can be done using the <table>, <tr>, <th>, and <td> elements.
Create a Table:
Use the element to define a table on your webpage.
html
<table>
<! — table rows and cells will go here →
</table>
Add Table Rows:
Use the element to define a table row. Each row will contain cells for your data.
html
<table>
<tr>
<! — table cells will go here →
</tr>
</table>
Add Table Header Cells (Optional):
Use the element to define header cells. These cells are typically used for column or row headers.
html
<table>
<tr>
<th>Header 1</th>
<th>Header 2</th>
<! — add more header cells if needed →
</tr>
<tr>
<! — data cells will go here →
</tr>
</table>
Add Table Data Cells:
Use the element to define data cells within your rows.
html
<table>
<tr>
<th>Header 1</th>
<th>Header 2</th>
</tr>
<tr>
<td>Data 1</td>
<td>Data 2</td>
<! — add more data cells if needed →
</tr>
</table>
Putting it all together, here’s a simple example:
html
<!DOCTYPE html>
<html>
<head>
<title>Simple Table Example</title>
</head>
<body>
<h2>Sample Table</h2>
<table border=”1">
<tr>
<th>Header 1</th>
<th>Header 2</th>
</tr>
<tr>
<td>Data 1</td>
<td>Data 2</td>
</tr>
<tr>
<td>Data 3</td>
<td>Data 4</td>
</tr>
</table>
</body>
</html>
In this example, a table with two columns and three rows is created. The first row contains header cells (<th>), and the subsequent rows contain data cells (<td>). The border=”1" attribute is used to add a border to the table for better visibility, but it’s not required. You can customize the structure and appearance of the table according to your needs.
5. What is SVG in HTML?
SVG stands for Scalable Vector Graphics. It is an XML-based vector image format that is used to define two-dimensional vector graphics for the web. SVG images can be created and edited with any text editor, and they can be scaled to different sizes without losing quality. In HTML, SVG is often used to embed vector graphics directly into a web page.
Here are some key points about SVG in HTML:
XML-Based Format: SVG is based on XML (eXtensible Markup Language), which means that SVG files are essentially text files that can be created and edited with a text editor.
Vector Graphics: SVG is well-suited for describing vector graphics, which are graphics that are defined by mathematical equations. This makes SVG images scalable without loss of quality, as they can be resized to any size.
Embedding in HTML: SVG images can be embedded directly into HTML documents using the <svg> element. This allows you to include graphics within your HTML code, and they can be manipulated using CSS and JavaScript.
html
<svg width=”100" height=”100">
<circle cx=”50" cy=”50" r=”40" stroke=”black” stroke-width=”3" fill=”red” />
</svg>
Interactive Elements: SVG supports interactive elements and can be scripted using JavaScript. This allows for dynamic and interactive graphics on web pages.
Graphics Editing Software: SVG files can be created using graphics editing software like Adobe Illustrator or Inkscape, and then the generated SVG code can be directly embedded into HTML.
Using SVG in HTML is beneficial for creating graphics that need to scale well across different screen sizes and resolutions. It is widely supported by modern web browsers.
6. In HTML, how do you separate a section of text?
In HTML, you can use various elements to separate and structure different sections of text. Here are a few commonly used elements for this purpose.
Paragraphs (<p>):
Use the <p> element to define paragraphs of text. Each <p> tag creates a new paragraph, and the content inside the tag is treated as a separate block.
html
<p>This is the first paragraph.</p>
<p>This is the second paragraph.</p>
Headings (<h1>, <h2>, <h3>, <h4>, <h5>, <h6>):
Headings are used to define headings for sections of content. They create a hierarchical structure with <h1> being the highest level and <h6> being the lowest.
html
<h1>Main Heading</h1>
<h2>Subheading 1</h2>
<h3>Sub-subheading 1.1</h3>
Divisions (<div>):
The <div> element is a generic container that can be used to group and separate content. It doesn’t add any specific styling or formatting by default, but it can be styled with CSS.
html
<div>
<p>This is a paragraph inside a div.</p>
</div>
Line Breaks (<br>):
The <br> element is used to insert a line break within text, effectively creating a new line without starting a new paragraph.
html
This is some text.<br>
This is on a new line.
Choose the element that best fits your content structure. Combining these elements allows you to create well-organized and semantically meaningful HTML documents.
7. How do you Create Nested Web Pages in HTML?
Creating nested web pages in HTML involves structuring your HTML documents in a hierarchical manner. This is typically done using HTML tags to represent different levels of content. Here’s a simple example of how you can create nested web pages.
html
<!DOCTYPE html>
<html lang=”en”>
<head>
<meta charset=”UTF-8">
<meta name=”viewport” content=”width=device-width, initial-scale=1.0">
<title>Nested Pages Example</title>
</head>
<body>
<! — Main Page Content →
<header>
<h1>Main Page</h1>
</header>
<nav>
<ul>
<li><a href=”#”>Home</a></li>
<li><a href=”#”>About</a></li>
<li><a href=”#”>Contact</a></li>
</ul>
</nav>
<main>
<section>
<h2>Introduction</h2>
<p>This is the main content of the page.</p>
</section>
<! — Nested Page →
<section>
<h2>Subpage</h2>
<p>This is a nested page within the main page.</p>
</section>
<! — Another Nested Page →
<section>
<h2>Another Subpage</h2>
<p>This is another nested page within the main page.</p>
</section>
</main>
<! — Footer →
<footer>
<p>© 2023 Your Website</p>
</footer>
</body>
</html>
In this example:
The main page contains a header, navigation bar, main content, and a footer.
The main content includes sections representing different parts of the page.
Two sections () within the main content are considered as nested pages. These sections can be thought of as subpages within the main page.
You can extend this structure further based on your needs. You might also use other tags like <article>, <aside>, <div>, etc., depending on the semantic meaning of the content. The key is to maintain a logical structure that reflects the hierarchy of your content.

Thanks for reading ,hopefully you like the article if you want to take Full stack Masters course from our Institute please attend our live demo sessions or contact us: +918464844555 providing you with the best Online Full Stack Developer Course in Hyderabad with an affordable course fee structure.
0 notes
Text
Pnpm workspaces

#Pnpm workspaces how to
#Pnpm workspaces free
app centric repositories which are used mainly for developing applications and products.Those repos are characterized by most commonly having a packages folder and which are then commonly published to some public registry such as NPM. This is a common setup in the open source world and can be seen in repositories such as Angular, React, Vue and many others. package centric repositories which are used for developing and publishing a cohesive set of reusable packages.There are generally two kinds of monorepo: The structure of a monorepo might vary depending on what you plan to use it for. This will be the root package.json for our PNPM monorepo.Įnter fullscreen mode Exit fullscreen mode Let's create a new folder named pnpm-mono, cd into it and then run pnpm init to generate a top-level package.json. I also recommend using something like Volta in particular if you have to deal with multiple different versions of NPM/PNPM and node versions. The official docs have an installation page with detailed instructions. To get started, let's make sure you have PNPM installed. Defining task dependencies (aka build pipeline).Consuming our shared-ui package from the Remix app.
#Pnpm workspaces free
Important: If you are already familiar with the setup and configuration of a new PNPM workspace, feel free to skip to the part where we add Nx later in the article.
#Pnpm workspaces how to
We will learn how to run commands with PNPM, how to run them in parallel and finally we're going to add Nx for a more sophisticated task scheduling, including command caching and more. Otherwise, stick with the thing everyone is comfortable using.In this article we're going to have a deep dive into setting up a new monorepo using PNPM workspaces that hosts a Remix application as well as a React based library. To sum it all up, if you have a monorepo or performance issues with NPM, consider using an alternative option like PNPM or Yarn. I came across PNPM and it was instantly beneficial to me, so I stuck with it. That said, I don't feel like I can fairly evaluate the two because I don't have enough experience with Yarn Workspaces. Its approach to structuring the node_modules directory is of great benefit when managing several projects with package.json files in the same repository. PNPM, on the other hand, seems very much focused on monorepo support. Yarn has a feature called Workspaces that is geared toward making Yarn work well for monorepos. Yarn has significant performance improvements over NPM, and it's a more popular and accepted option when compared to PNPM.Īnd if your project is a monorepo, PNPM and Yarn are both good options. When NPM's performance becomes an issue, I'd likely first switch to Yarn. Generally speaking, I'd say no, not necessarily! There's a ton of value in using the ubiquitous option - which, unlike the word ubiquitous, is the one people best understand and are most comfortable using.īut there are two scenarios in which I'd welcome a change: Is it really a good idea to use an NPM alternative when the default (NPM) actually works fine, but is maybe a bit slow? And, like Yarn, it's much much faster than plain old NPM. It's like Yarn in that it is a command-line tool that helps you manage JavaScript project dependencies using the NPM registry. That may lead you to the question I asked when I first heard about PNPM: Is it just another NPM alternate? PNPM stands for Performant NPM, which means it stands for performant node package manager.
0 notes
Text
Using Docker for Full Stack Development and Deployment

1. Introduction to Docker
What is Docker? Docker is an open-source platform that automates the deployment, scaling, and management of applications inside containers. A container packages your application and its dependencies, ensuring it runs consistently across different computing environments.
Containers vs Virtual Machines (VMs)
Containers are lightweight and use fewer resources than VMs because they share the host operating system’s kernel, while VMs simulate an entire operating system. Containers are more efficient and easier to deploy.
Docker containers provide faster startup times, less overhead, and portability across development, staging, and production environments.
Benefits of Docker in Full Stack Development
Portability: Docker ensures that your application runs the same way regardless of the environment (dev, test, or production).
Consistency: Developers can share Dockerfiles to create identical environments for different developers.
Scalability: Docker containers can be quickly replicated, allowing your application to scale horizontally without a lot of overhead.
Isolation: Docker containers provide isolated environments for each part of your application, ensuring that dependencies don’t conflict.
2. Setting Up Docker for Full Stack Applications
Installing Docker and Docker Compose
Docker can be installed on any system (Windows, macOS, Linux). Provide steps for installing Docker and Docker Compose (which simplifies multi-container management).
Commands:
docker --version to check the installed Docker version.
docker-compose --version to check the Docker Compose version.
Setting Up Project Structure
Organize your project into different directories (e.g., /frontend, /backend, /db).
Each service will have its own Dockerfile and configuration file for Docker Compose.
3. Creating Dockerfiles for Frontend and Backend
Dockerfile for the Frontend:
For a React/Angular app:
Dockerfile
FROM node:14 WORKDIR /app COPY package*.json ./ RUN npm install COPY . . EXPOSE 3000 CMD ["npm", "start"]
This Dockerfile installs Node.js dependencies, copies the application, exposes the appropriate port, and starts the server.
Dockerfile for the Backend:
For a Python Flask app
Dockerfile
FROM python:3.9 WORKDIR /app COPY requirements.txt . RUN pip install -r requirements.txt COPY . . EXPOSE 5000 CMD ["python", "app.py"]
For a Java Spring Boot app:
Dockerfile
FROM openjdk:11 WORKDIR /app COPY target/my-app.jar my-app.jar EXPOSE 8080 CMD ["java", "-jar", "my-app.jar"]
This Dockerfile installs the necessary dependencies, copies the code, exposes the necessary port, and runs the app.
4. Docker Compose for Multi-Container Applications
What is Docker Compose? Docker Compose is a tool for defining and running multi-container Docker applications. With a docker-compose.yml file, you can configure services, networks, and volumes.
docker-compose.yml Example:
yaml
version: "3" services: frontend: build: context: ./frontend ports: - "3000:3000" backend: build: context: ./backend ports: - "5000:5000" depends_on: - db db: image: postgres environment: POSTGRES_USER: user POSTGRES_PASSWORD: password POSTGRES_DB: mydb
This YAML file defines three services: frontend, backend, and a PostgreSQL database. It also sets up networking and environment variables.
5. Building and Running Docker Containers
Building Docker Images:
Use docker build -t <image_name> <path> to build images.
For example:
bash
docker build -t frontend ./frontend docker build -t backend ./backend
Running Containers:
You can run individual containers using docker run or use Docker Compose to start all services:
bash
docker-compose up
Use docker ps to list running containers, and docker logs <container_id> to check logs.
Stopping and Removing Containers:
Use docker stop <container_id> and docker rm <container_id> to stop and remove containers.
With Docker Compose: docker-compose down to stop and remove all services.
6. Dockerizing Databases
Running Databases in Docker:
You can easily run databases like PostgreSQL, MySQL, or MongoDB as Docker containers.
Example for PostgreSQL in docker-compose.yml:
yaml
db: image: postgres environment: POSTGRES_USER: user POSTGRES_PASSWORD: password POSTGRES_DB: mydb
Persistent Storage with Docker Volumes:
Use Docker volumes to persist database data even when containers are stopped or removed:
yaml
volumes: - db_data:/var/lib/postgresql/data
Define the volume at the bottom of the file:
yaml
volumes: db_data:
Connecting Backend to Databases:
Your backend services can access databases via Docker networking. In the backend service, refer to the database by its service name (e.g., db).
7. Continuous Integration and Deployment (CI/CD) with Docker
Setting Up a CI/CD Pipeline:
Use Docker in CI/CD pipelines to ensure consistency across environments.
Example: GitHub Actions or Jenkins pipeline using Docker to build and push images.
Example .github/workflows/docker.yml:
yaml
name: CI/CD Pipeline on: [push] jobs: build: runs-on: ubuntu-latest steps: - name: Checkout Code uses: actions/checkout@v2 - name: Build Docker Image run: docker build -t myapp . - name: Push Docker Image run: docker push myapp
Automating Deployment:
Once images are built and pushed to a Docker registry (e.g., Docker Hub, Amazon ECR), they can be pulled into your production or staging environment.
8. Scaling Applications with Docker
Docker Swarm for Orchestration:
Docker Swarm is a native clustering and orchestration tool for Docker. You can scale your services by specifying the number of replicas.
Example:
bash
docker service scale myapp=5
Kubernetes for Advanced Orchestration:
Kubernetes (K8s) is more complex but offers greater scalability and fault tolerance. It can manage Docker containers at scale.
Load Balancing and Service Discovery:
Use Docker Swarm or Kubernetes to automatically load balance traffic to different container replicas.
9. Best Practices
Optimizing Docker Images:
Use smaller base images (e.g., alpine images) to reduce image size.
Use multi-stage builds to avoid unnecessary dependencies in the final image.
Environment Variables and Secrets Management:
Store sensitive data like API keys or database credentials in Docker secrets or environment variables rather than hardcoding them.
Logging and Monitoring:
Use tools like Docker’s built-in logging drivers, or integrate with ELK stack (Elasticsearch, Logstash, Kibana) for advanced logging.
For monitoring, tools like Prometheus and Grafana can be used to track Docker container metrics.
10. Conclusion
Why Use Docker in Full Stack Development? Docker simplifies the management of complex full-stack applications by ensuring consistent environments across all stages of development. It also offers significant performance benefits and scalability options.
Recommendations:
Encourage users to integrate Docker with CI/CD pipelines for automated builds and deployment.
Mention the use of Docker for microservices architecture, enabling easy scaling and management of individual services.
WEBSITE: https://www.ficusoft.in/full-stack-developer-course-in-chennai/
0 notes
Text
Last Macos Version

The Coro Claw flute cutter video shows how easily the Coro Claw X is to use. Crop signs, pictures and shapes to suit your needs by taking off excess material. If you want single strips for a construction project, the Coro Claw X cuts straight through the corrugated plastic to give you widths of any size. Claw game for mac. The game features a rare glimpse of Dr. In March 2000, it was announced that Ubi Soft had teamed with Light & Shadow Production to release an Inspector Gadget game for the PlayStation. Tha game was revealed as Inspector Gadget: Gadget's Crazy Maze, with a Game Boy Color title Inspector Gadget: Operation Madkactus, following as well. The miner's claw swings back and forth and you will click once when the claw is pointed at the treasure you want to reel up. There is about 10 seconds wait time while the miner reels up bigger gold nuggets from the bottom of the screen, which are obviously worth more money, and smaller objects are reeled up quickly. 2021-01-10 2 points one of my childhood favorite games, if you download the RIP version, Captain Claw will run very slow and choppy, but there a way to fix this problem. You have to download 'dgVoodoo2' program, extract it from zip file then copy 'dgVoodooCpl.exe', the 'dgVooDoo.conf' and the 3 dll files that's inside the MS file to the main directory where you're claw file is, then open. Toreba is a fun game, but it isn’t without its fair share of flaws. There are many problems with the game, and some of these problems can make or break the player experience. In this section, we highlight all the problems that players have with Toreba. Delayed Shipping. As mentioned earlier, Toreba has free shipping once every seven days.
Node.js® is a JavaScript runtime built on Chrome's V8 JavaScript engine. #BlackLivesMatter New security releases now available for 15.x, 14.x, 12.x and 10.x release lines. If you can't get Node.Js to work on your computer, do the following to reset it: Open the installation folder. Find the 'nodejs' folder and delete it. Double-click the Node.Js installation file to restart the installation. Use the default settings to install Node.Js. Node js install mac tutorial. Node.js® is a JavaScript runtime built on Chrome's V8 JavaScript engine. Latest LTS Version: 14.16.0 (includes npm 6.14.11) Download the Node.js source code or a pre-built installer for your platform, and start developing today. Fortunately, for Windows users, the Node.js® installation process is a lot easier than how I recommend installing Node.js® on a Mac. Node isn’t a program that you simply launch like Word or Photoshop: you won’t find it pinned to the taskbar or in your list of Apps.
Mountain Lion, the last of the 'cat' versions of macOS launched in July 2012 and supported the following Macs: iMac (Mid-2007 or newer) MacBook (Late 2008 Aluminum, or Early 2009 or newer). MacOS Sierra (version 10.12) is the thirteenth major release of macOS (previously known as OS X and Mac OS X), Apple Inc.' S desktop and server operating system for Macintosh computers. The name 'macOS' stems from the intention to uniform the operating system's name with that of iOS, watchOS and tvOS.
Last Version Of Macos
Latest Macos Version Download
Reported by:Owned by: Component: guest additions Version: VirtualBox 6.0.14 Keywords: Cc: Guest type: OSX Server Host type: Mac OS X
Some system extensions aren't compatible with current versions of macOS or won't be compatible with a future version of macOS. Learn what to do if you see an alert about system extensions or kernel extensions. I am using a macOS 10.14 guest, with the latest development builds of VirtualBox Version 6.1.0BETA1 r134041 (Qt5.6.3), GuestEditions, and VB Extensions matching that version. This also occurs with the latest stable builds of all three installs Version 6.0.14 r133895 (Qt5.6.3) (different machine, also running macOS 10.14). When going to install. While it carries the macOS name, it is the first major version change in more than 15 years-officially dropping the 10.x and going by 11.x. The transition is projected to last two years. Windows 7 ultimate 32 bit download.
Description
Attachments
catalina-guest-install.log (5.8 KB) - added by Kalak17 months ago.
install.log from a guest additions install on macOS 10.15 Catalina
macOS10.15-2019-10-07-17-24-21.log (286.6 KB) - added by Kalak17 months ago.
machine log from macOS host
Change History
Changed 17 months ago by Kalak
attachmentcatalina-guest-install.log added
Changed 17 months ago by Kalak
attachmentmacOS10.15-2019-10-07-17-24-21.log added
comment:1 in reply to: ↑ description Changed 17 months ago by socratis
comment:3 Changed 13 months ago by aeichner
Status changed from new to closed
Resolution set to fixed
comment:4follow-up:↓ 5 Changed 13 months ago by GlebKh
Last Version Of Macos
comment:5 in reply to: ↑ 4 Changed 13 months ago by QA
comment:6follow-ups:↓ 7↓ 12 Changed 10 months ago by AKuehnel
Last edited 10 months ago by AKuehnel (previous) (diff)
comment:7 in reply to: ↑ 6 Changed 10 months ago by GammaG
Last edited 10 months ago by GammaG (previous) (diff)
comment:8 Changed 9 months ago by paulson
Status changed from closed to reopened
Resolutionfixed deleted
comment:9 Changed 9 months ago by paulson
Summary changed from Guest Additions not installing on macOS 10.15 Catalia guests to Guest Additions not installing on macOS 10.15 Catalina guests
comment:10follow-up:↓ 11 Changed 9 months ago by DGH
comment:11 in reply to: ↑ 10 Changed 6 months ago by kydar

Latest Macos Version Download
comment:12 in reply to: ↑ 6 Changed 3 months ago by atoolz
Last edited 3 months ago by atoolz (previous) (diff)
comment:14 Changed 3 weeks ago by pf5946
0 notes
Text
Customer Convos: BinaryOps Software

This piece is a part of our Customer Convos series. We’re sharing stories of how people use npm at work. Want to share your thoughts? Drop us a line.
Q: Hi! Can you state your name, what you do, and/or what your company does?
A: I'm Mark Voorberg, one of the co-founders at BinaryOps Software. We build custom business software using the latest tools and technologies.
How’s your day going?
So far, so good! The sun is shining, the birds are chirping, and I'm in my happy place working through some code for a customer.
Tell me the story of npm at your company. What specific problem did you have that npm solved?
We started using npm back as far as 2013 to install published packages in our first application prototype built with Node. Fast-forward a few years and we released a simple Grunt plugin on npm. After that we've decided to create an npm Organization and release a much larger project that includes multiple packages.
To people who are unsure what they could use npm for — how would you explain the use case?
npm is a great way to find and install reusable NodeJS packages or to publish your own. Packages can be public or private which means it's not just for open source projects, but internal ones as well.
How’s the day to day experience of using npm?
npm has become part of our regular workflow, whether it's searching for functionality that we don't need to invent, looking up a package that we've used before, or simply publishing updates to one of our own packages.
Would you recommend that another org or company use npm and why?
In my mind, npm is the de-facto standard for package management on Node. Hosting packages anywhere else is an unnecessary risk that you can do without.
Any cool npm stuff your company has done publicly that you’d like to promote?
At the end of 2017, we published a project called TransomJS. It's a collection of packages that allow us to create full-featured REST APIs with metadata. For example, there's a Transom package that translates JSON metadata into Mongoose models. It creates the corresponding endpoints for common CRUD interactions and then some. Everything from audit fields, data type validations, mapped relationships, and querying are handled by the Transom-Mongoose package. Similar packages exist for Authentication, Websockets, SMTP messages, content templating etc. It's a cool project and lets us move quickly, only having to write the parts of an app that make it unique, anything that can be abstracted away can be put into its own Transom module.
2 notes
·
View notes
Text
Manage AWS ElastiCache for Redis access with Role-Based Access Control, AWS Secrets Manager, and IAM
Amazon ElastiCache for Redis is an AWS managed, Redis-compliant service that provides a high-performance, scalable, and distributed key-value data store that you can use as a database, cache, message broker, or queue. Redis is a popular choice for caching, session management, gaming, leaderboards, real-time analytics, geospatial, ride-hailing, chat and messaging, media streaming, and pub/sub apps. You can authenticate in ElastiCache for Redis in one of two ways: via an authentication token or with a username and password via Role-Based Access Control (RBAC) for ElastiCache for Redis 6 and later. Although authentication with a token allows administrators to restrict reads and writes to ElastiCache replication groups via a password, RBAC enhances this by introducing the concept of ElastiCache users and groups. Additionally, with RBAC in Amazon ElastiCache for Redis 6, administrators can specify access strings for each ElastiCache user—further defining which commands and keys they can access. When configured for RBAC, ElastiCache for Redis replication groups authenticate ElastiCache RBAC users based on the credentials provided when connections are established. Authorization to Redis commands and keys are defined by the access strings (in Redis ACL syntax) for each ElastiCache RBAC user. ElastiCache RBAC users and ACLs, however, aren’t linked to AWS Identity Access Management (IAM) roles, groups, or users. The dissociation between IAM and Redis RBAC means that there is no out-of-the-box way to grant IAM entities (roles, users, or groups) read and write access to Redis. In this post, we present a solution that allows you to associate IAM entities with ElastiCache RBAC users and ACLs. The overall solution demonstrates how ElastiCache RBAC users can effectively be associated with IAM through the user of AWS Secrets Manager as a proxy for granting access to ElastiCache RBAC user credentials. Solution overview To demonstrate this solution, we implement the following high-level steps: Define a set of ElastiCache RBAC users; each with credentials and ACL access strings. This defines the commands and keys that a user has access to. Grant IAM entities access to ElastiCache RBAC user credentials stored in Secrets Manager through secret policies and IAM policies. Configure users, applications, and services with roles or users that can access ElastiCache RBAC user credentials from Secrets Manager so they can connect to ElastiCache Redis by assuming an ElastiCache RBAC user. This also defines which commands and keys they have access to. Store Redis RBAC passwords in Secrets Manager You can create ElastiCache RBAC users via the AWS Command Line Interface (AWS CLI), AWS API, or AWS CloudFormation. When doing so, they’re specified with a plaintext password and a username. These credentials must then be shared with the actors who access the Redis replication group via ElastiCache RBAC users (human users or applications). The solution we present uses Secrets Manager to generate a password that is used when the ElastiCache RBAC user is created, meaning that no plaintext passwords are exposed and must be retrieved through Secrets Manager. Manage access to ElastiCache RBAC user passwords in Secrets Manager with IAM You can restrict access to the credentials stored in Secrets Manager to specific IAM entities by defining a secret resource policy in addition to IAM policies. IAM entities can then retrieve the credentials by making the appropriate AWS API or AWS CLI call. See the following code: { "Version" : "2012-10-17", "Statement" : [ { "Effect" : "Allow", "Principal" : { "AWS" : "arn:aws:iam::1234567890123:role/producer" }, "Action" : [ "secretsmanager:DescribeSecret", "secretsmanager:GetSecretValue" ], "Resource" : "arn:aws:secretsmanager:us-west-2:1234567890123:secret:producerRBACsecret " } ] } Manage access to ElastiCache for Redis with ElastiCache RBAC, Secrets Manager, and IAM In essence, we’re creating a mapping between IAM roles and ElastiCache RBAC users by defining which IAM roles, groups, and users can retrieve credentials from Secrets Manager. The following diagram demonstrates the flow of the solution. First, an actor with an IAM role that has permissions to the secret (named Producer Credentials) reads it from Secrets Manager (Steps 1 and 2). Next, the actor establishes a connection with the credentials to an ElastiCache replication group (3). After the user is authenticated (4), they can perform commands and access keys (5)— the commands and keys that can be accessed are defined by the ElastiCache RBAC user’s access string. Implementation in AWS Cloud Development Kit We present the solution to you in the AWS Cloud Development Kit (AWS CDK), which is a software development framework that defines infrastructure through object-oriented programming languages—in our case, Typescript. You can clone the code from the GitHub repo. The following is deployed: One VPC with isolated subnets and one Secrets Manager VPC endpoint One security group with an ingress rule that allows all traffic in via port 6379 Three ElastiCache RBAC users: default, consumer, producer Three secrets: default, producer, consumer One ElastiCache RBAC user group One ElastiCache subnet group One ElastiCache replication group One AWS Key Management Service (AWS KMS) customer master key (CMK) to encrypt the three secrets One KMS CMK key to encrypt the ElastiCache replication group Three IAM roles: consumer, producer, outsider One AWS Lambda layer that contains the redis-py Python module Three Lambda functions: producerFn, consumerFn, outsiderFn The following diagram illustrates this architecture. A VPC is created to host the ElastiCache replication group and the Lambda functions. The code snippet defines the VPC with an isolated subnet, which in AWS CDK terms is a private subnet with no routing to the internet. For resources in the isolated subnet to access Secrets Manager, a Secrets Manager VPC interface endpoint is added. See the following code: const vpc = new ec2.Vpc(this, "Vpc", { subnetConfiguration: [ { cidrMask: 24, name: 'Isolated', subnetType: ec2.SubnetType.ISOLATED, } ] }); const secretsManagerEndpoint = vpc.addInterfaceEndpoint('SecretsManagerEndpoint', { service: ec2.InterfaceVpcEndpointAwsService.SECRETS_MANAGER, subnets: { subnetType: ec2.SubnetType.ISOLATED } }); secretsManagerEndpoint.connections.allowDefaultPortFromAnyIpv4(); To modularize the design of the solution, a RedisRbacUser class is also created. This class is composed of two AWS CDK resources: a Secrets Manager secret and an ElastiCache CfnUser; these resources are explicitly grouped together because the secret stores the CfnUser password, and as we show later, read and decrypt permissions to the secret are granted to an IAM user. See the following code: export class RedisRbacUser extends cdk.Construct { ... constructor(scope: cdk.Construct, id: string, props: RedisRbacUserProps) { super(scope, id); ... this.rbacUserSecret = new secretsmanager.Secret(this, 'secret', { generateSecretString: { secretStringTemplate: JSON.stringify({ username: props.redisUserName }), generateStringKey: 'password', excludeCharacters: '@%*()_+=`~{}|[]:";'?,./' }, }); const user = new elasticache.CfnUser(this, 'redisuser', { engine: 'redis', userName: props.redisUserName, accessString: props.accessString? props.accessString : "off +get ~keys*", userId: props.redisUserId, passwords: [this.rbacUserSecret.secretValueFromJson('password').toString()] }) ... } } An IAM role is granted the ability to read the RedisRbacUser’s secret. This association means that the IAM role can decrypt the credentials and use them to establish a connection with Redis as the producerRbacUser: const producerRole = new iam.Role(this, producerName+'Role', { ... }); producerRbacUser.grantSecretRead(producerRole) The function grantSecretRead in the RedisRbacUser class modifies the role that is passed into it to allow it to perform actions secretsmanager:GetSecretValue and secretsmanager:DescribeSecret. The same function also modifies the secret by adding a resource policy that allows the same actions and adds the role to the principal list. This prevents unlisted principals from attempting to access the secret after the stack is deployed. See the following code: public grantReadSecret(principal: iam.IPrincipal){ if (this.secretResourcePolicyStatement == null) { this.secretResourcePolicyStatement = new iam.PolicyStatement({ effect: iam.Effect.ALLOW, actions: ['secretsmanager:DescribeSecret', 'secretsmanager:GetSecretValue'], resources: [this.rbacUserSecret.secretArn], principals: [principal] }) this.rbacUserSecret.addToResourcePolicy(this.secretResourcePolicyStatement) } else { this.secretResourcePolicyStatement.addPrincipals(principal) } this.rbacUserSecret.grantRead(principal) } A Lambda function uses the IAM role created previously to decrypt the credentials stored in the secret and access the ElastiCache for Redis replication group. The ElastiCache primary endpoint address and port as well as the secret ARN are provided via environment variables. See the following code: const producerLambda = new lambda.Function(this, producerName+'Fn', { ... role: producerRole, ... environment: { redis_endpoint: ecClusterReplicationGroup.attrPrimaryEndPointAddress, redis_port: ecClusterReplicationGroup.attrPrimaryEndPointPort, secret_arn: producerRbacUser.getSecret().secretArn, } }); Deploy the solution The infrastructure for this solution is implemented in AWS CDK in Typescript and can be cloned from the GitHub repository. For instructions on setting up your environment for AWS CDK, see Prerequisites. To deploy the solution, first install the node dependencies by navigating to the root of the project and running the following command in the terminal: $ npm install Next, build the Lambda .zip files that are used in the Lambda functions. To do so, enter the following command in your terminal: $ npm run-script zip To deploy the solution to your account, run the following command from the root of the project: $ cdk deploy The command attempts to deploy the solution in the default AWS profile defined in either your ~/.aws/config file or your ~/.aws/credentials file. You can also define a profile by specifying the --profile profile_name at the end of the command. Test the solution Three Lambda functions are deployed as a part of the stack: Producer – Decrypts the producer credentials from Secrets Manager and establishes a connection to Redis with these credentials. After it’s authenticated as the producer RBAC user, the function attempts to set a key (time) with a string representation of the current time. If the function attempts to perform any other commands, it fails because the producer RBAC user only allows it to perform SET operations. Consumer – Decrypts the consumer credentials from Secrets Manager and establishes a connection to Redis with these credentials. After it’s authenticated as the consumer RBAC user, the function attempts to get the value of the time key that was set by the producer. The function fails if it attempts to perform other Redis commands because the access string for the consumer RBAC user only allows it to perform GET operations. Outside – Attempts to decrypt the producer credentials from Secrets Manager and fails because the function’s role doesn’t have permission to decrypt the producer credentials. Create a test trigger for each function To create a test event to test each function, complete the following steps: On the Lambda console, navigate to the function and choose Test. Select Create new test event. For Event template, choose test. Use the default JSON object in the body—the test functions don’t read the event contents. Trigger each test by choosing Test. Producer function writes to Redis The producer function demonstrates how you can use an IAM role attached to a Lambda function to retrieve an ElastiCache RBAC user’s credentials from Secrets Manager, and then use these credentials to establish a connection to Redis and perform a write operation. The producer function writes a key time with a value of the current time. The producer function can write to Redis because its IAM role allows it to get and decrypt the Producer credentials in Secrets Manager, and the Producer ElastiCache RBAC user’s access string was defined to allow SET commands to be performed. The producer function can’t perform GET commands because the same access string doesn’t allow GET commands to be performed. See the following code: const producerRbacUser = new RedisRbacUser(this, producerName+'RBAC', { ... accessString: 'on ~* -@all +SET' }); Consumer function can read but can’t write to Redis This function demonstrates the use case in which you allow a specific IAM role to access ElastiCache RBAC credentials from Secrets Manager and establish a connection with Redis, but the actions it can perform are restricted by an access string setting. The consumer function attempts to write a key time with a value of the current time, and subsequently attempts to read back the key time. The consumer function can’t write to Redis, but it can read from it. Even though the function has an IAM role that permits it to get and decrypt the Consumer credentials in Secrets Manager, the Consumer ElastiCache RBAC user was created with a Redis ACL access string value that only allows the GET command. See the following code: const consumerRbacUser = new RedisRbacUser(this, consumerName+'RBAC', { ... accessString: 'on ~* -@all +GET' }); Outsider function can’t read or write to Redis The outsider function demonstrates the use case in which you specify an IAM role that can’t access Redis because it can’t decrypt credentials stored in Secrets Manager. The outsider Lambda function attempts to decrypt the Producer credentials from Secrets Manager, then read and write to the Redis cluster. An exception is raised that indicates that it’s not permitted to access the Producer secret. The IAM role attached to it doesn’t have the permissions to decrypt the Producer secret, and the secret it’s trying to decrypt has a resource policy that doesn’t list the role in the principals list attribute. Cost of running the solution The solution to associate an IAM entity with an ElastiCache RBAC user requires deploying a sample ElastiCache cluster, storing secrets in Secrets Manager, and defining an ElastiCache RBAC user and user group. To run this solution in us-east-1, you can expect the following costs. Please note that costs vary by region. Secrets Manager $0.40 per secret per month, prorated for secrets stored less than a month $0.05 per 10,000 API calls Assuming each of the three secrets are called 10 times for testing purposes in one day, the total cost is (3 * $0.40 / 30) + (3 * 10 / 1000) * $0.05 = $0.04015 ElastiCache cache.m6g.large node $0.077 per hour Assuming that the node used for one day, the total cost is $1.848 Lambda function $0.0000000021 per millisecond of runtime Assuming that each function is called 10 times for testing purposes in one day and that the average runtime is 400 milliseconds, the total cost is 3 * 400 * $0.000000021 = $0.00000252 AWS KMS $1 per month, per key, prorated to the hour $0.03 per 10000 API calls Assuming that the solution is torn down after 24 hours, the total cost for two keys is 2 * 1 / 31 = $0.06 The total cost of the solution, for 24 hours, assuming that each of the three Lambda functions are called 10 times, is $1.95. Clean up the resources To delete all resources from your account, including the VPC, call the following command from the project root folder: $ cdk destroy As in the cdk deploy command, the destroy command attempts to run on the default profile defined in ~/.aws/config or ~/.aws/credentials. You can specify another profile by providing --profile as a command line option. Conclusion Although fine-grained access is now possible with the inclusion of Redis Role-Based Access Control (RBAC) users, user groups, and access strings in Amazon ElastiCache for Redis 6.x, there is no out-of-the box ability to associate ElastiCache RBAC users with IAM entities (roles, users, and groups). This post presented a solution that restricted ElastiCache RBAC credentials (username and password) access by storing them in Secrets Manager and granting select IAM entities permissions to decrypt these credentials—effectively linking ElastiCache RBAC users with IAM roles by way of Secrets Manager as a proxy. Additional benefits presented in this solution include: ElastiCache RBAC passwords aren’t defined, stored, or shared in plaintext when ElastiCache RBAC users are created ElastiCache RBAC users and groups can be defined wholly in AWS CDK (and by extension AWS CloudFormation) and included as infrastructure as code You can trace Redis access to IAM users because ElastiCache RBAC credentials are stored and accessed through Secrets Manager and access to these credentials can be traced via AWS CloudTrail From this post, you learned how to authorize access to specific ElastiCache Redis keys and commands through access strings. For more information about how to configure access strings, see Authenticating users with Role-Based Access Control (RBAC). Beyond the scope of this post is also the topic of secret key rotation. It’s recommended to further secure your infrastructure by rotating ElastiCache RBAC user credentials stored in Secrets Manager on a periodic basis. This requires the creation of a custom Lambda function to rotate and set the new password. For more information, see Rotating AWS Secrets Manager Secrets for One User with a Single Password. The custom Lambda function makes API calls to modify the existing user password (in Boto through the modify_user method). About the authors Claudio Sidi is a DevOps Cloud Architect at AWS Professional Services. His role consists of helping customers to achieve their business outcomes through the use of AWS services and DevOps technologies. Outside of work, Claudio loves going around the Bay Area to play soccer pickup games, and he also enjoys watching sport games on TV. Jim Gallagher is an AWS ElastiCache Specialist Solutions Architect based in Austin, TX. He helps AWS customers across the world best leverage the power, simplicity, and beauty of Redis. Outside of work he enjoys exploring the Texas Hill Country with his wife and son. Mirus Lu is a DevOps Cloud Architect at AWS Professional Services, where he helps customers innovate with AWS through operational and architectural solutions. When he’s not coding in Python, Typescript or Java, Mirus enjoys playing the guitar, working on his car and playing practical jokes on unsuspecting friends and coworkers. https://aws.amazon.com/blogs/database/manage-aws-elasticache-for-redis-access-with-role-based-access-control-aws-secrets-manager-and-iam/
0 notes
Link
The Evolution of the Jupyter Notebook
Project Jupyter exists to develop open-source software, open standards, and services for interactive and reproducible computing.
Since 2011, the Jupyter Notebook has been our flagship project for creating reproducible computational narratives. The Jupyter Notebook enables users to create and share documents that combine live code with narrative text, mathematical equations, visualizations, interactive controls, and other rich output. It also provides building blocks for interactive computing with data: a file browser, terminals, and a text editor.
The Jupyter Notebook has become ubiquitous with the rapid growth of data science and machine learning and the rising popularity of open-source software in industry and academia:
Today there are millions of users of the Jupyter Notebook in many domains, from data science and machine learning to music and education. Our international community comes from almost every country on earth.¹ The Jupyter Notebook now supports over 100 programming languages, most of which have been developed by the community. There are over 1.7 million public Jupyter notebooks hosted on GitHub. Authors are publishing Jupyter notebooks in conjunction with scientific research, academic journals, data journalism, educational courses, and books. At the same time, the community has faced challenges in using various software workflows with the notebook alone, such as running code from text files interactively. The classic Jupyter Notebook, built on web technologies from 2011, is also difficult to customize and extend.
JupyterLab: Ready for Users
JupyterLab is an interactive development environment for working with notebooks, code and data. Most importantly, JupyterLab has full support for Jupyter notebooks. Additionally, JupyterLab enables you to use text editors, terminals, data file viewers, and other custom components side by side with notebooks in a tabbed work area.
JupyterLab enables you to arrange your work area with notebooks, text files, terminals, and notebook outputs. JupyterLab provides a high level of integration between notebooks, documents, and activities:
Drag-and-drop to reorder notebook cells and copy them between notebooks.
Run code blocks interactively from text files (.py, .R, .md, .tex, etc.).
Link a code console to a notebook kernel to explore code interactively without cluttering up the notebook with temporary scratch work.
Edit popular file formats with live preview, such as Markdown, JSON, CSV, Vega, VegaLite, and more.
JupyterLab has been over three years in the making, with over 11,000 commits and 2,000 releases of npm and Python packages. Over 100 contributors from the broader community have helped build JupyterLab in addition to our core JupyterLab developers.
To get started, see the JupyterLab documentation for installation instructions and a walk-through, or try JupyterLab with Binder. You can also set up JupyterHub to use JupyterLab.
Customize Your JupyterLab Experience
JupyterLab is built on top of an extension system that enables you to customize and enhance JupyterLab by installing additional extensions. In fact, the builtin functionality of JupyterLab itself (notebooks, terminals, file browser, menu system, etc.) is provided by a set of core extensions.
JupyterLab extensions enable you to work with diverse data formats such as GeoJSON, JSON and CSV.²
Among other things, extensions can:
Provide new themes, file editors and viewers, or renderers for rich outputs in notebooks;
Add menu items, keyboard shortcuts, or advanced settings options;
Provide an API for other extensions to use.
Community-developed extensions on GitHub are tagged with the jupyterlab-extension topic, and currently include file viewers (GeoJSON, FASTA, etc.), Google Drive integration, GitHub browsing, and ipywidgets support.
Develop JupyterLab Extensions
While many JupyterLab users will install additional JupyterLab extensions, some of you will want to develop your own. The extension development API is evolving during the beta release series and will stabilize in JupyterLab 1.0. To start developing a JupyterLab extension, see the JupyterLab Extension Developer Guide and the TypeScript or JavaScript extension templates.
JupyterLab itself is co-developed on top of PhosphorJS, a new Javascript library for building extensible, high-performance, desktop-style web applications. We use modern JavaScript technologies such as TypeScript, React, Lerna, Yarn, and webpack. Unit tests, documentation, consistent coding standards, and user experience research help us maintain a high-quality application.
JupyterLab 1.0 and Beyond
We plan to release JupyterLab 1.0 later in 2018. The beta releases leading up to 1.0 will focus on stabilizing the extension development API, user interface improvements, and additional core features. All releases in the beta series will be stable enough for daily usage.
JupyterLab 1.0 will eventually replace the classic Jupyter Notebook. Throughout this transition, the same notebook document format will be supported by both the classic Notebook and JupyterLab.
9 notes
·
View notes
Text
Ghost: Best Blogging Platform| How To Install Ghost On Windows
Do you love to write? What is your ultimate goal when you begin writing? The biggest question is which platform you use to share your penned thoughts?
You know what, ultimately, writing is something you can't fake. Right?
And most importantly, your precious words need a brilliant platform so that every developer, designer or writer out there grasp the purpose of your writing.
This article is going to show your words the right paradise to stay or a platform where you can share anything without any predicament. Let’s talk about Ghost now.
An Overview Of Ghost
Ghost is an open-source blogging platform that simply helps to share blogs over the millions of amusing and latest topics. Simply, that relies on a crisp and minimal user interface. In other words, the ghost is made for bloggers or writers.
The main purpose for the Ghost blogging platform was first composed about at the start of November 2012, in a blog post by project founder John O'Nolan, the former deputy lead for the WordPress User Interface team, after becoming discouraged with the complexity of using WordPress as a blog rather than a content management system.
The ‘Ghost’ is a success with a thriving open-source community profit for many businesses. Companies like digital-ocean and others using ghost to host their blogs.
Blogging & Personal Websites are the colossal part of the internet. And many people and companies use Ghost for hosting blogs. The goal behind creating a ghost blogging platform was simple, lean, and modern. Something with all the great parts of WordPress without being over-bloated. Instead, if we talk about the best description of Ghost it comes from O'Nolan's own powerful words, he stated that "it's just a blogging website". Now, let’s understand Ghost for beginners and the process of how to install Ghost in the below section.
How To Install Ghost On Windows?
Initially, you need to update your OS by going to control panel > System and Security > Windows Update > Check for updates.
After the upgradation process, Go to http://nodejs.org/download/ then click on the Windows installer to proceed further to download the .msi installer.
Now go to http://ghost.org, login, and click the blue Download Ghost Source pre button.
In the location of your choice, create a folder called Ghost and expand the contents of the ghost.zip into it.
Now open the Node.js Command Prompt, which can be found in your Start menu. There is a Node.js app and a Node.js Command Prompt. Make sure you open the Command Prompt.
Now you need to change directories to the Ghost folder you created:
cd [ path to where you have created the Ghost folder ]
7. Now install Ghost
npm install --production
Ghost Welcomes You!
Ghost Features
The ghost holds a myriad of features in its Feature Index. We are going to explain some of the foremost in the following list.
1.Custom Branding: With the unstoppable support of custom branding, it takes control of your site's branding entirely. And most importantly they never put the Ghost logo anywhere on the site.
2. Posts: It's another foremost feature of Ghost and considered as the primary data type within ghost posts. It simply helps to build simple or complex collections of the regular published content.
3. Multi-language: This striking feature allows you to publish content in any language, rather than a feed of posts or pages allow for easy creation of many things like contact pages.
4. Code Injection: You can add simply the custom code to your own site's header/ footer, per page or site-wide, specifically in the requirement of different scripts with extra styles.
5. Fullscreen Editing: In this feature, you will never face any distraction, any clusters, as this is just a platform for publishing data content. The editor of the ghost gets out of your way and lets you focus on what you do best.
6. Markdown Support: The Ghost editor has Markdown in its DNA, with automatic autocompletion of Markdown syntax as you type.
7. Embed Cards: You can easily add automatic embed from Twitter, YouTube, SoundCloud, Spotify, Instagram, CodePen, Vimeo, Flickr and many more.
8. Custom URLs: It generates short readable URLs by default, and also allows you to override and configure them however you like.
Note: Giphy taken from Google
Roles & Permissions
You can easily set up your site with sensible user roles and permissions built-in from the start.
Contributors: Can log in and write posts, but cannot publish.
Authors: Can create and publish new posts and tags.
Editors: Can invite, manage and edit authors and contributors.
Administrators: Have full permissions to edit all data and settings.
Owner: An admin who cannot be deleted + has access to billing details.
Custom Themes
Ghost ships with a simple Handlebars.js front-end theme layer which is very straightforward to work with and surprisingly powerful. Many people stick with the default theme (live demo / source code), which provides a clean magazine design - but this can be modified or entirely replaced.
The Ghost Theme Marketplace provides a selection of pre-made third-party themes which can be installed with ease. Of course you can also build your own Handlebars Theme or use a different front-end altogether.
Self-hosting or Managed?
In the Ghost Blogging Platform, there are foremost three ways to host Ghost Website. Now we are going to provide you some of its hosting packages.
Self- Hosting using:
Digital Ocean
Blue Host
Microsoft Azure
Amazon Web Services (AWS)
2. Managed Hosting Using:
Ghost Pro, by using the creators of Ghost
Fast Comet
A2 Hosting
Runkite
3. Self- Hosting Using YOUR Server & OUR Service!
Pros & Cons of using Managed Hosting
Managed hosting is an IT provisioning design in which a service provider charters distributed servers and associated hardware to a private customer and manages those operations on the customer's side. Ghost is one of them that holds the many pros and cons through a publisher can publish or host their content without any doubt. We are providing you some of them in the below section.
Pros of Using Managed Hosting
Peace of mind
Managed by experts
Provides Trial availability usually for (2 weeks) without credit card
SSL may be enabled by default
Backups, Patches, and other server tasks are undertaken by the experts.
Moreover, if something goes wrong they lose sleep and it saves your a lot of time and energy in the long run.
Cons of Using Managed Hosting
You will have to depend on the support team for your issues.
Limited control and no SSH access.
You don't learn anything about the Ghost barebones. The hacker in you might remain dissatisfied for not being able to tinker around.
Every provider has his own limitations and you need to tread carefully.
Signing Off
Hopefully you are able to decide whether Ghost is a suitable blogging platform for you after playing around with it. Try out this interesting platform.
Good Luck!
0 notes